Windows 10 Wi-Fi Problem? Here's How to Fix It
1. Wi-Fi Is Connected but You Don’t Have Internet
Sometimes, Windows will claim you’re connected to the internet and that the connection is secure, but you won’t be able to access the web. Normally, the issue is caused by either a faulty TCP/IP stack, IP address, or DNS client resolver cache.
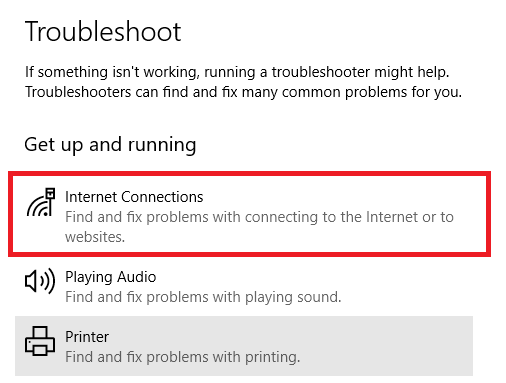
Firstly, try running Windows’s native Network Troubleshooting tool. You’ll find it in Settings Update and security Troubleshoot Internet connections.
If that doesn’t work, open Command Prompt and type the following commands. Press Enter after each command:
If none of that worked, try these tips for the connected to Wi-Fi, but no internet issue.
2. Windows 10 Won’t Connect to Wi-Fi
If you see a message that reads Windows 10 can’t connect to this network while attempting to establish a network connection, your network adapter is probably to blame.
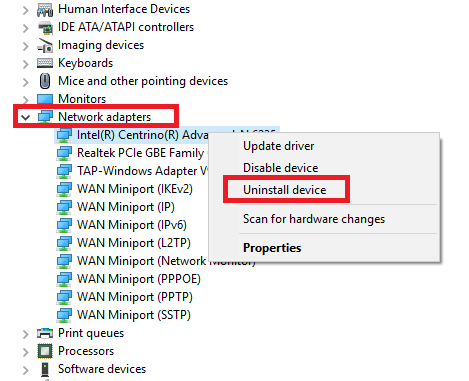
The best solution is to uninstall the network adapter’s driver and allow Windows to reinstall it automatically.
Follow the steps below to complete the process:
3. Wi-Fi Doesn’t Have a Valid IP Configuration
If you see the Wi-Fi Doesn’t Have a Valid IP Configuration message, you should start by entering the four networking commands we listed earlier.
If the issue persists, there are two further steps you can take.
Change the Network Name and Password
Some users have reported that simply changing their network’s name and password fixed the problem.
The precise instructions vary between routers, but typically you need to connect to your router using an ethernet cable, enter your router’s IP address in your browser, log into the device’s portal, and locate the correct fields. Make sure you use the right type of Wi-Fi security when you change this info.
Set the Wi-Fi Network’s Channel Width
Without getting too technical, routers can broadcast their networks on different channels. If too many routers in close proximity use the same channel, the airwaves can become cluttered.
Log into your router’s portal and locate the channel setting. If possible, set it to Auto. If there’s no Auto setting, try a few different channels and see if your problem goes away.
4. How to Find Wi-Fi Password on Windows 10
If you’ve bought a new router (or been issued a new one by your ISP), you should always spend the time to change the network’s default name and password. It’s good practice from a security standpoint.
But what if you then forget the password you created? You could reset the router, but there’s a less drastic solution.
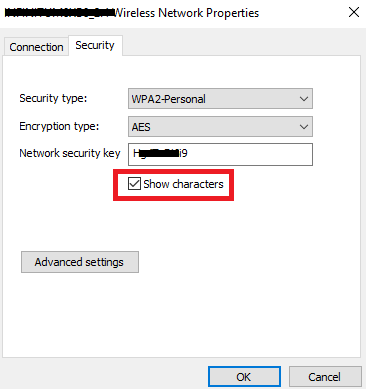
Just follow the steps below:
5. Windows 10 Wi-Fi Driver Issues
We’ve already explained how to delete and reinstall your Wi-Fi driver earlier in the article, but there are a couple of other steps you can also try if you’re having Wi-Fi driver issues on Windows 10. Namely, you can try to either update the driver or roll it back to a previous version.
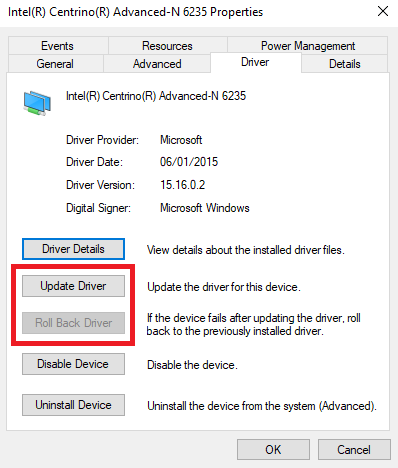
To update your Wi-Fi driver, follow the steps below:
If Windows cannot find an updated driver automatically, you should be able to find it on the manufacturer’s website.
6. No Wi-Fi Networks Found
If your Windows machine cannot find your Wi-Fi network, make some basic troubleshooting checks before moving on. Is the router turned on? Are you within range of the network?
If the answer to both those questions is yes, the next step is to try updating and/or reinstalling the network adapter’s driver. We have already shown you how to do it.
Lastly, you can try changing the region of your Wi-Fi adapter. It’s easy to do, just use the guide below:
Note: Not all network adapters have access to the Country and Region property.
7. Forget Wi-Fi Network on Windows 10
Sometimes, you need your machine to forget a Wi-Fi network. Perhaps you have a new router, or you’re just having a clear out of old networks that you once connected to but no longer use.
Forgetting a Wi-Fi network on Windows 10 is easy:
8. Windows 10 Keeps Dropping the Wi-Fi Connection
If you find Windows 10 repeatedly drops the Wi-Fi connection without warning (and you’re sure there are no issues with the router), the problem could be caused by your network adapter’s power management settings.
You need to revoke the permission which allows Windows to turn off the adapter to save power. To do so, you’ll once again need to return to the Device Manager:
9. Your Firewall Prevents Connecting to the Network
Windows comes with a built-in firewall app. It either permits or blocks incoming and outgoing traffic to help protect you against malicious content. However, sometimes, it can block web access for your entire computer.
Obviously, this is not the default behavior. Perhaps you accidentally changed a setting without realizing, or a rogue app overrode your existing rules.
Thankfully, whatever the cause, it’s easy to fix. The solution below works for both the native firewall app as well as any third-party firewall apps you’re running:
To turn your firewalls back on, return to Command Prompt and type netsh advfirewall set allprofiles state on.
10. Your Antivirus Prevents Connecting to the Network
As with the firewall, your anti-virus can also cause connection issues.
You can see which anti-virus apps are installed on your machine by going to the Windows Defender Security Center. You can find it in the list of All Apps on the Start Menu.
When you’ve opened the app, expand the panel on the left-hand side and click Virus and Threat Protection. It will tell you which apps are active and provide you with a shortcut for the app interfaces.
Access the interface of any apps you’re running and temporarily disable the service.
Sometimes, Windows will claim you’re connected to the internet and that the connection is secure, but you won’t be able to access the web. Normally, the issue is caused by either a faulty TCP/IP stack, IP address, or DNS client resolver cache.
Firstly, try running Windows’s native Network Troubleshooting tool. You’ll find it in Settings Update and security Troubleshoot Internet connections.
If that doesn’t work, open Command Prompt and type the following commands. Press Enter after each command:
- netsh winsock reset
- ipconfig /release
- netsh int ip reset
- ipconfig /renew
- ipconfig /flushdns
If none of that worked, try these tips for the connected to Wi-Fi, but no internet issue.
2. Windows 10 Won’t Connect to Wi-Fi
If you see a message that reads Windows 10 can’t connect to this network while attempting to establish a network connection, your network adapter is probably to blame.
The best solution is to uninstall the network adapter’s driver and allow Windows to reinstall it automatically.
Follow the steps below to complete the process:
- Press Windows key + X and click on Device Manager.
- Right-click on the network adapter and choose Uninstall.
- If prompted, click on Delete the driver software for this device.
- Restart your machine and Windows will automatically reinstall the driver.
3. Wi-Fi Doesn’t Have a Valid IP Configuration
If you see the Wi-Fi Doesn’t Have a Valid IP Configuration message, you should start by entering the four networking commands we listed earlier.
If the issue persists, there are two further steps you can take.
Change the Network Name and Password
Some users have reported that simply changing their network’s name and password fixed the problem.
The precise instructions vary between routers, but typically you need to connect to your router using an ethernet cable, enter your router’s IP address in your browser, log into the device’s portal, and locate the correct fields. Make sure you use the right type of Wi-Fi security when you change this info.
Set the Wi-Fi Network’s Channel Width
Without getting too technical, routers can broadcast their networks on different channels. If too many routers in close proximity use the same channel, the airwaves can become cluttered.
Log into your router’s portal and locate the channel setting. If possible, set it to Auto. If there’s no Auto setting, try a few different channels and see if your problem goes away.
4. How to Find Wi-Fi Password on Windows 10
If you’ve bought a new router (or been issued a new one by your ISP), you should always spend the time to change the network’s default name and password. It’s good practice from a security standpoint.
But what if you then forget the password you created? You could reset the router, but there’s a less drastic solution.
Just follow the steps below:
- Right-click on the Network icon on the Taskbar.
- Choose Open Network Internet Settings.
- In the new window, click on Change adapter options.
- Right-click on your Wi-Fi connection and select Status.
- Click on Wireless Properties.
- Click on the Security tab.
- Mark the checkbox next to Show Characters.
5. Windows 10 Wi-Fi Driver Issues
We’ve already explained how to delete and reinstall your Wi-Fi driver earlier in the article, but there are a couple of other steps you can also try if you’re having Wi-Fi driver issues on Windows 10. Namely, you can try to either update the driver or roll it back to a previous version.
To update your Wi-Fi driver, follow the steps below:
- Right-click on the Start Menu.
- Click on Device Manager.
- Expand the drop-down menu below Network Adapters.
- Right-click on your adapter and select Properties.
- Click on the Driver tab.
- Choose either Update Driver or Roll Back Driver.
If Windows cannot find an updated driver automatically, you should be able to find it on the manufacturer’s website.
6. No Wi-Fi Networks Found
If your Windows machine cannot find your Wi-Fi network, make some basic troubleshooting checks before moving on. Is the router turned on? Are you within range of the network?
If the answer to both those questions is yes, the next step is to try updating and/or reinstalling the network adapter’s driver. We have already shown you how to do it.
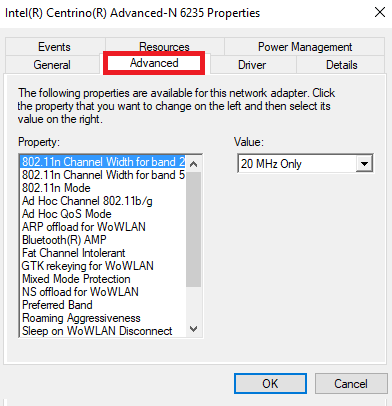
Lastly, you can try changing the region of your Wi-Fi adapter. It’s easy to do, just use the guide below:
- Press Windows key + R.
- Type devmgmt.msc and press Enter.
- Expand the Network Adapters section.
- Right-click on the name of your network adapter.
- Choose Properties.
- Click on the Advanced tab.
- Highlight Country and Region.
- Choose the entry according to your location.
Note: Not all network adapters have access to the Country and Region property.
7. Forget Wi-Fi Network on Windows 10
Sometimes, you need your machine to forget a Wi-Fi network. Perhaps you have a new router, or you’re just having a clear out of old networks that you once connected to but no longer use.
Forgetting a Wi-Fi network on Windows 10 is easy:
- Open the Start Menu and click on Settings.
- Click on Network and Internet.
- Choose Wi-Fi from the menu on the left-hand side of the screen.
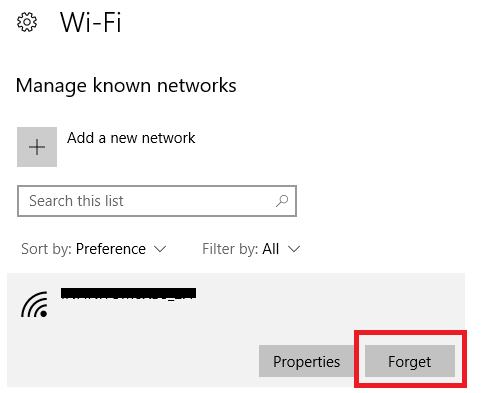
- Click on Manage known networks.
- Highlight the name of the network you want to forget.
- Click on Forget.
8. Windows 10 Keeps Dropping the Wi-Fi Connection
If you find Windows 10 repeatedly drops the Wi-Fi connection without warning (and you’re sure there are no issues with the router), the problem could be caused by your network adapter’s power management settings.
You need to revoke the permission which allows Windows to turn off the adapter to save power. To do so, you’ll once again need to return to the Device Manager:
- Right-click on the Start Menu and choose Device Manager.
- Expand the list below Network Adapters.
- Right-click on your network adapter.
- Select Properties.
- Click on the Power Management tab.
- Unmark the checkbox next to Allow the computer to turn off this device to save power.
9. Your Firewall Prevents Connecting to the Network
Windows comes with a built-in firewall app. It either permits or blocks incoming and outgoing traffic to help protect you against malicious content. However, sometimes, it can block web access for your entire computer.
Obviously, this is not the default behavior. Perhaps you accidentally changed a setting without realizing, or a rogue app overrode your existing rules.
Thankfully, whatever the cause, it’s easy to fix. The solution below works for both the native firewall app as well as any third-party firewall apps you’re running:
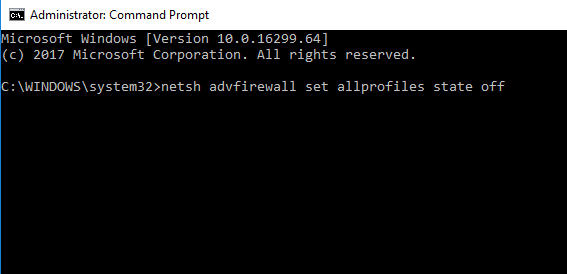
- Open the Start Menu and type Command Prompt.
- Right-click on the top link and select Run as administrator.
- Type netsh advfirewall set allprofiles state off and press Enter.
- Test whether internet access is now working.
To turn your firewalls back on, return to Command Prompt and type netsh advfirewall set allprofiles state on.
10. Your Antivirus Prevents Connecting to the Network
As with the firewall, your anti-virus can also cause connection issues.
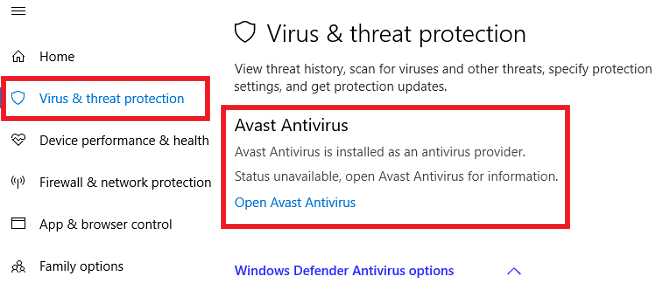
You can see which anti-virus apps are installed on your machine by going to the Windows Defender Security Center. You can find it in the list of All Apps on the Start Menu.
When you’ve opened the app, expand the panel on the left-hand side and click Virus and Threat Protection. It will tell you which apps are active and provide you with a shortcut for the app interfaces.
Access the interface of any apps you’re running and temporarily disable the service.


